


Summary
A custom domain API lets you embed domain search, registration, and DNS configuration directly into your app's publish flow, so users never have to leave your platform to launch on their own domain. See how one AI app builder used it to go from kickoff to production in three days.
Domain registration embedded directly in your publish flow means users can go from “build complete” to a domain configured for their new site or app without leaving your product. The name.com API makes this possible by combining domain availability, registration, and DNS operations.
One common UX failure in app-building platforms shows up at the publish step. A user finishes their site or app, clicks Publish, and gets redirected to a third-party registrar to search for a domain, complete a purchase, and then copy-paste DNS records back into your platform. By the time they return (if they return), the momentum is gone.
This guide shows how to wire domain search, registration, and DNS configuration directly into your publish flow using our API. You'll see how the API operations connect, how to test the integration safely in the sandbox, and how to structure the sequence so domain setup doesn't interrupt the publish experience. The Hercules AI app builder used the name.com API to add in-product domain registration and went from kickoff to production in three days.
The third-party redirect problem
The publish step is one of the highest-intent moments in a creator platform, and friction there can quickly turn into abandonment because every additional step gives users another reason to stop before their site goes live.
One way to avoid sending users to a completely separate registrar is to embed a hosted registration experience using an iFrame. This can get the feature shipped, but it gives the platform less control over the domain search and registration workflow. The domain also still needs to be connected to the published application, which can require DNS or nameserver configuration.
A native integration using the name.com API keeps that workflow inside your existing publish UI. Your platform can handle domain search, availability, pricing, registration, and DNS configuration through its own interface while maintaining the application state around the publish event. The user gets a single, cohesive flow instead of having to switch between your platform and a separate domain service.
API operations behind the publish flow
Three API operations connect domain registration to your publish event.
1. Check availability with POST /core/v1/domains:checkAvailability
This endpoint accepts up to 50 domain names and returns purchase eligibility and pricing for each. The key response fields include purchasable, purchasePrice, and premium; the request's purchaseType filter lets you restrict results to standard registrations.
Set purchaseType: "registration" in your request body to filter to standard new registrations, which is recommended for predictable pricing and immediate fulfillment. Other purchase types (such as aftermarket) can involve higher costs and non-instant fulfillment, creating unpredictable UX at the publish step.
// checkAvailability request
{
  "domainNames": ["myapp.com", "myapp.io", "myapp.dev"],
  "purchaseType": "registration"
}

// Partial response, one result object per domain
{
  "domainName": "myapp.com",
  "purchasable": true,           // domain is available to register now
  "purchaseType": "registration",
  "purchasePrice": 12.99,        // one-year registration price (illustrative)
  "premium": false               // standard registry pricing, not premium
}
2. Register the domain with POST /core/v1/domains
Once the user confirms their selection, call this endpoint to register the domain.The response returns the registered domain's details, including its nameservers, creation date, and expiry date, which your platform can use to update its domain state and continue with DNS configuration.
// create domain response (abbreviated)
{
  "domain": {
    "domainName": "myapp.com",
    "nameservers": ["ns1.name.com", "ns2.name.com"],
    "locked": true,
    "autorenewEnabled": true,
    "createDate": "2025-07-15T00:00:00Z",
    "expireDate": "2026-07-15T00:00:00Z"
  }
}
Some TLDs (particularly country-code registries like .CA or .DE) have additional eligibility requirements. Check the endpoint documentation at docs.name.com if you're supporting non-.com TLDs.
3. Configure DNS with POST /core/v1/dns/{domainName}/records
We treat domain registration and DNS configuration as separate operations. After registration completes, call the DNS records endpoint to point the domain at your platform's infrastructure. Whether you write an A record, a CNAME, or delegate to nameservers depends on your platform's architecture. If DNS is managed outside your platform, you may instead need to set the domain's nameservers to that of the external DNS provider’s.
Full schema documentation for all three endpoints is at docs.name.com.
Authentication and sandbox testing
The name.com API uses HTTP Basic Auth. Your API username goes in the username field and your API token goes in the password field. Tokens are generated under Account Settings, then Security, then API Tokens at name.com/nameapi. If your account has two-factor authentication enabled, toggle name.com API Access on that same Security screen, otherwise API requests will return an authentication error..
We keep the two environments completely separate. Production runs at https://api.name.com. The sandbox runs at https://api.dev.name.com and uses a different credential pair, where you append -test to your production username (so yourcompany becomes yourcompany-test) and generate a dedicated development token. Our sandbox comes with preloaded test credit, so you can exercise the registration flow, including the purchase step, without incurring real charges.
One caveat worth noting, sandbox domain availability, pricing, and DNS behavior can differ from production. Use the sandbox to validate the integration logic and async state handling, but don't treat it as a perfect mirror of what users will encounter.
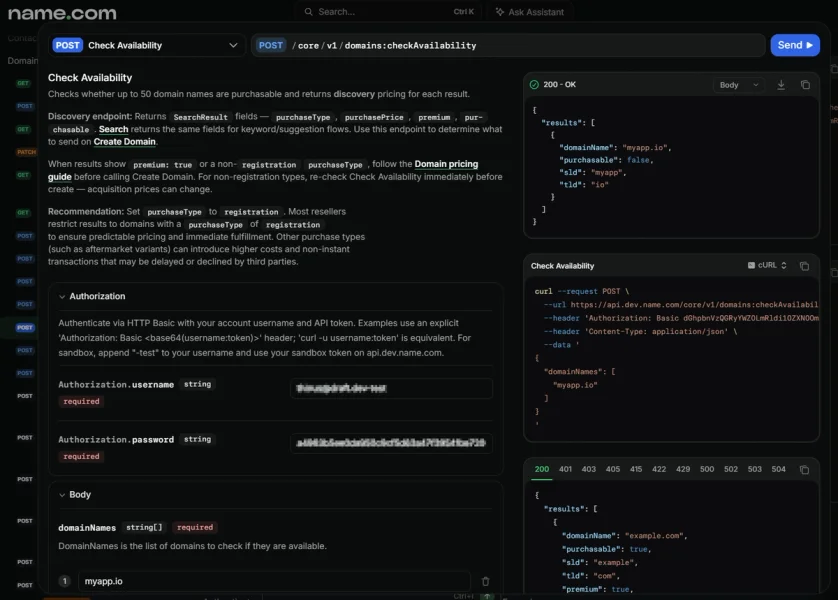
Complete authentication and sandbox environment setup documentation is at docs.name.com.
How to wire domain registration into your publish event
The integration follows a publish-flow sequence, starting with an availability check when the user enters a domain, then registration on confirmation, DNS configuration after registration completes, and finally marking the domain ready in your platform state.
Each step maps to a concrete implementation decision.
- Trigger
checkAvailabilityon input. TriggercheckAvailabilitywhen the user searches for or selects a domain. Returnpurchasablestatus andpurchasePricefor each result. Filtering topurchaseType: "registration"keeps results focused on standard registrations. - Present options with pricing. Display the price returned by the availability response rather than requiring the user to leave the publish flow to discover the cost.
- Register on confirmation. Call
POST /core/v1/domainsafter the user confirms their selection. Treat registration as an asynchronous application state: show a “registering” state rather than blocking the publish UI, and use the registration completion event to determine when the domain is ready for the next step. Because registration is a billable operation, include anX-Idempotency-Keyso a retry after a timeout doesn't result in a duplicate purchase. - Configure DNS after registration completes. Once your platform receives confirmation that registration has completed, configure the domain's DNS records or nameservers according to your DNS architecture. The record type depends on your infrastructure: for example, an A or CNAME record can point the domain at your application's ingress or load balancer, while a platform that manages DNS through its own nameservers can delegate the domain to those nameservers.
- Mark the domain ready. Update your publish state once DNS configuration completes.
Once DNS configuration succeeds, update the domain state in your platform and tell the user that public DNS resolution may take additional time to become available.
What does it take to embed domain registration into an existing platform?
The core flow covers checking domain availability, registering the selected domain, and configuring DNS to connect it to your platform. You’ll need API credentials from name.com and a backend integration that handles the async registration state before your publish flow marks a domain as connected. The sandbox at api.dev.name.com is preloaded with test credit, so you can validate the full flow (including domain purchase) before connecting anything to production.
Do I need to become a domain registrar to offer domains inside my product?
No. name.com provides the registrar infrastructure and handles the registry-facing operations, while your platform makes the API calls and owns the user-facing experience. You control the domain search interface, pricing display, and checkout flow without having to build your own registrar infrastructure.
How does a native API integration differ from an iFrame solution?
A native API integration gives your platform complete control over the domain search, registration, and DNS configuration experience. The UI matches your product, checkout sits inside your publish flow, and you control the surrounding experience, workflow, and support experience. An iFrame embeds a third-party interface inside your product, which is faster to ship initially, but users encounter a visually distinct context, you have limited control over how registration fits into the publish moment, and support responsibilities are split across two systems.
How long does domain registration take through the API?
The API request itself is typically quick, but your integration should treat registration as an asynchronous workflow rather than assuming the domain is immediately ready. Use the registration completion event to advance your platform state, then configure DNS and wait for public DNS resolution separately.
What happens if a domain the user wants is unavailable?
The checkAvailability endpoint returns purchasable: false for unavailable domains. Build your UI to surface alternative TLDs from the same response, since the endpoint accepts up to 50 domain names in a single call. Returning several TLD variants for the user’s chosen name gives them immediate alternatives without requiring another availability request.
Which DNS record type should I write after registration?
If your platform manages DNS directly, you might create an A or CNAME record pointing at the infrastructure that serves the application. If DNS is managed externally, you may instead configure the domain’s nameservers for that provider.
Can I support TLDs beyond .com?
Yes, though some country-code TLDs (such as .CA or .DE) have additional eligibility requirements at the registry level. Check the TLD requirements documentation before exposing non-.com TLDs.
What Hercules built and what you can do right now
Hercules (an AI-assisted app builder) shipped a native domain integration using the name.com API and went from kickoff to production in three days. The team used our OpenAPI 3.1 specification with an AI coding agent to generate the integration code. The specification gave the AI coding agent a structured, machine-readable contract to work from, reducing the amount of API behavior the team had to describe manually.
The Hercules experience surfaced something worth paying attention to. The API work was fast, but what took time was the product work, specifically how to lay out domain search results, how to present pricing in context, how to design the checkout confirmation step, and how to communicate domain connection status clearly to users who may not understand DNS propagation. The Hercules team noted that reference UX flows for common integration patterns could be more valuable than additional API documentation.
The Hercules case study also reports a strong correlation between domain connection and higher customer lifetime value. That makes the publish-moment integration more than a convenience feature for the team: it gives users a way to complete a key step without leaving the platform.
Pull the OpenAPI 3.1 specification, point your AI coding agent at it, and start by validating checkAvailability and POST /core/v1/domains in the sandbox. The sandbox is preloaded with test credit, you can exercise the end-to-end registration and DNS configuration flow without real charges, and verify how your platform handles the async registration state before anything touches production.
Create your API account at name.com/nameapi and explore the full reference at docs.name.com.

